
One tab at a time...
This is where I
gave up last time I tried to make this thing.
I think it was
all those ^#($#@! little individual teeth on pieces 33 and 36.
I mean really now, you get piece 33 cut out, maybe you even
get the bracing pieces 34 (with all those ridiculous little
zigzags) and 35 (with the tiny little edges to fold over) cut
out. But then you still have piece 36. And THEN you have
to the glue individual slices of piece 37, each and every one.
Tip for pieces 34 and 37:
Before cutting out all the zigzags on piece 34 and all the
slices of piece 37, do your scoring with the tip of the Xacto.
After the pieces are cut out, it will be hard to make those
scores evenly.
Tip for
piece 33: The instructions don't say explicitly,
although a marker for a bead is indicated in the middle of
piece 33. This bead's purpose appears to be to make
putting the axle through the center of the wheel easier. Glue
it into place before you glue down piece 36.
Tip for piece 37: Cut
carefully make the strips out of piece 37. There are no
extras given, so if you make a mistake on one of the strips,
you'll have to improvise replacements.

There is a bead marker on piece
33 and do glue in a bead that will fit the large size axle.
It will help later when you're trying to thread the axle
through all the pieces. I don't have any good tips on making
piece 33 line up with piece 36 so that the tabs are also all
lined up. You just have to give it your best shot and try not
to get too frustrated.

Do take a break and congratulate
yourself once you've gotten the motor wheel assembled, or
you'll wind up with a neck cramp from "The Hunch" position. 
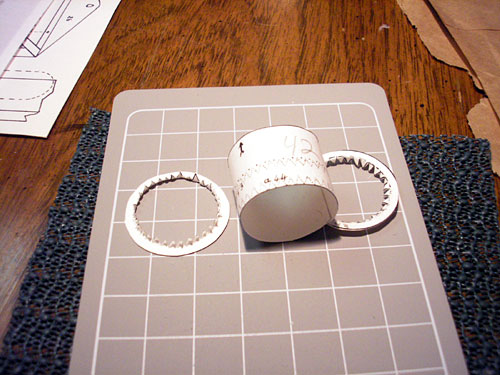
Below is a picture of our
assembled wheel, which only had one sorta questionably
attached tooth! (For extra points, spot the tooth.)

The pulley will be
attached to the motor wheel and that's pieces 39-49. Work in
numerical order and follow the cut instructions carefully.
 Tip
for piece 39: Mark the "b" and the "c" on the
INSIDE of the piece before you cut those letters away.
Also note that the center lines of the triangle points need to
be cut, not scored. Tip
for piece 39: Mark the "b" and the "c" on the
INSIDE of the piece before you cut those letters away.
Also note that the center lines of the triangle points need to
be cut, not scored.

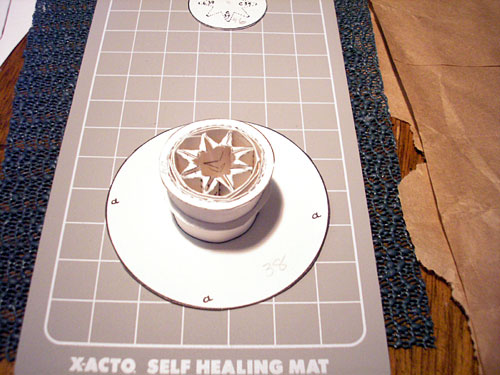
Glue piece 39 to 38 on the
star-shaped pattern.
Then glue the ends of piece 40
together.
Line up the "a" and "b" on piece 41 with the same letters on
piece 40 and then glue the marked end of 41 onto 40.
Put glue on the inside of piece
40, and then slip it over piece 39 -- making sure that the
arrow on piece 40 is pointing toward where the motor wheel
will be.


 Put
together piece 42. Put
together piece 42.
Tip for
pieces 43 and 44: Before cutting out the pieces,
score the dashed lines first. This will make bending the
zigzags easier later. They are going to form the "collars"
that go over piece 42, the "throat" of the pulley.
 Glue
piece 45 inside the "throat." It covers the zigzags of pieces
43 and 44. Glue
piece 45 inside the "throat." It covers the zigzags of pieces
43 and 44.
 Now, wrap the free end of piece
41 around the pulley, and slip the barrel of piece 42 over it,
making sure that the arrow on 42 points toward the motor
wheel. Piece 42 will now turn freely in one direction,
but lock in the other. Now, wrap the free end of piece
41 around the pulley, and slip the barrel of piece 42 over it,
making sure that the arrow on 42 points toward the motor
wheel. Piece 42 will now turn freely in one direction,
but lock in the other.
Now glue pieces 46 and 47
together back to back, and then glue them to the open end of
piece 39 (the star-shaped pinion). Be careful not to let
them glue onto piece 42.

Note that piece 48 is mounted on
thick cardboard. It will need to be thick enough for a thin
rubber band to go around it. Make your axle holes as cleanly
as possible in this piece too -- it will be hard to push
through the cardboard.
Glue this piece onto the pulley
wheel and glue on the faceplate, piece 49. Assemble the
motor wheel by gluing the pulley onto the face of the motor
wheel, i.e. piece 38 onto piece 36.
This is the order they'll be in
when glued together:


Whew!
How about you stop and get a drink!
<== Back to
the FRAME
on to the MIDDLE WHEEL ==> |